
Making your own flash cartridge programming USB hardware !
First, you will need an USB board with AN2131SC or QC chip on it.
|
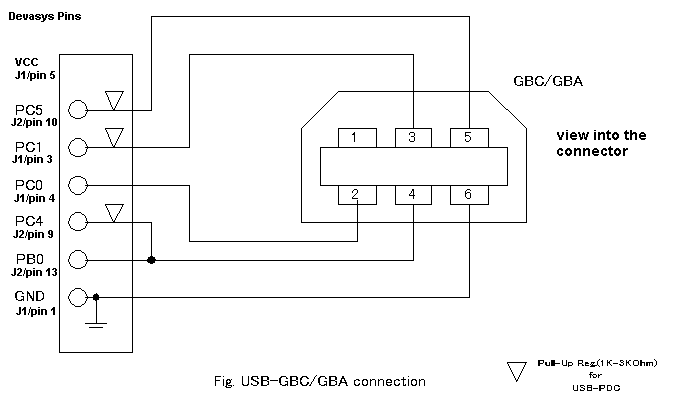
You can use this or any other hardware, but DevaSys is also perfect for other great USB projects :-). After that you have to add the GBA interface cable to the USB board. You can use half of an original Nintendo GBA Linkcable for the 6 pin connector. The pinning on GBA side is shown here ...
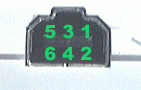 only pin
2(SOut), 3(SIn), 4(SD), 5(SClock) and 6(Gnd) are used.
only pin
2(SOut), 3(SIn), 4(SD), 5(SClock) and 6(Gnd) are used.
The GBA cable is connected this way.
After doing the hardware part (please disable the eeprom on the USB card), you will need to install the software. Remove all similar USB drivers like EZ Writer or Flash2Advance USB-Linker first. They also use similar hardware without using the eeprom.
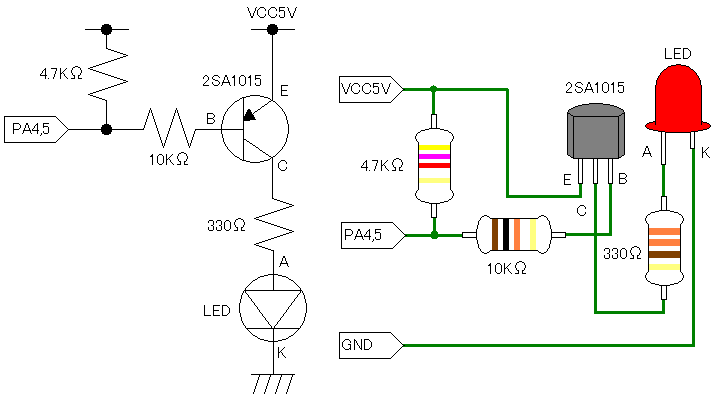
You can add a few LED's to your design and connect them to the ports PA4 and PA5.
PA4: Read from GBA PA5: Write to GBA Both: Multibooting
I made a special INF file for the DevaSys hardware, but it's just text inside the INF file. You can change it or use it with any other AN2131 USB hardware. After the installation you will see the following text inside your USB devices hardware list: DeVaSys I2CIO Rev: B
After starting the FlashManager programming software from Mootan, you will see the following text inside your USB devices hardware list: FlashManager ULA Hardware
Connect the USB-board to the USB port on your PC, put your flash cartridge in the GBA slot and connect the GBA with the USB programmer. Now run the FlashManager software and hold down Start+Select while turning on the GBA or during you can see the Nintendo logo.
Now your are ready for programming and don't forget to pay for the software. It's shareware and 20$ is nothing for such a great programming software !
Here is the link to the original page (japanese only)
Thank's to TeamKnox and Mootan for the great hardware and software !